Visible to Intel only — GUID: gvu1510885394615
Ixiasoft
1. CvP Initialization in Intel® Cyclone® 10 GX
2. Design Considerations for CvP Initialization in Intel® Cyclone® 10 GX
3. Understanding the Design Steps for CvP Initialization in Intel® Cyclone® 10 GX
4. CvP Driver and Registers
A. Document Revision History for Intel® Cyclone® 10 GX CvP Initialization over PCI Express User Guide
4.3.1. Intel® -defined Vendor Specific Capability Header Register
4.3.2. Intel® -defined Vendor Specific Header Register
4.3.3. Intel® Marker Register
4.3.4. CvP Status Register
4.3.5. CvP Mode Control Register
4.3.6. CvP Data Registers
4.3.7. CvP Programming Control Register
4.3.8. Uncorrectable Internal Error Status Register
4.3.9. Uncorrectable Internal Error Mask Register
4.3.10. Correctable Internal Error Status Register
4.3.11. Correctable Internal Error Mask Register
Visible to Intel only — GUID: gvu1510885394615
Ixiasoft
3.5.4. Programming CvP Images
You must program the periphery image (.periph.jic) and then download the core image (.core.rbf) using the PCIe Link. You can use JTAG to load different programming files (i.e. .jic/periph.pof) into your selected configuration device and configure CvP initialization enabled Intel® Cyclone® 10 GX device with AS configuration mode.
After loading the periphery image via the configuration device, the link should reach the expected data rate and link width. You can confirm the PCIe link status using the RW Utilities.
Follow these steps to program and test the CvP functionality:- Plug the Intel® Cyclone® 10 GX FPGA Development Kit into the PCI Express slot of the DUT PC and power it ON. Intel® recommends that you use the ATX power supply that the development kit includes.
- On the host PC, open the Intel® Quartus® Prime Tools menu and select Programmer.
- Click Auto Detect to verify that the USB Blaster recognizes the Intel® Cyclone® 10 GX FPGA.
- Follow these steps to program the periphery image:
- Select Intel® Cyclone® 10 GX device, and then right click None under File column.
- Navigate to .periph.jic file and click Open.
- Under Program/Configure column, select the respective devices. For example, 10CX220YF780E5G and EPCQL1024.
- Click Start to program the periphery image into EPCQL1024 flash.
Figure 10. Illustrating the specified options to the program periphery image
- After the .periph.jic is programmed, the FPGA must be powered cycle to allow the new peripheral image to load from the on-board flash into the FPGA. To force the host PC to re-enumerate the link with the new image, power cycle the DUT PC and the Intel® Cyclone® 10 GX Development Kit.
- You can use RW Utilities or another system software driver to verify the link status. You can also confirm expected link speed and width.
- Follow these steps to program the core image:
- Copy the .core.rbf file to appropriate Intel® Quartus® Prime bin install directory. Depending on the 32-bit or 64-bit system, the folder is …./quartus/bin32 or …./quartus/bin64.
- Open a Command Prompt in Windows, change the directory to the same mentioned above where the file is copied.
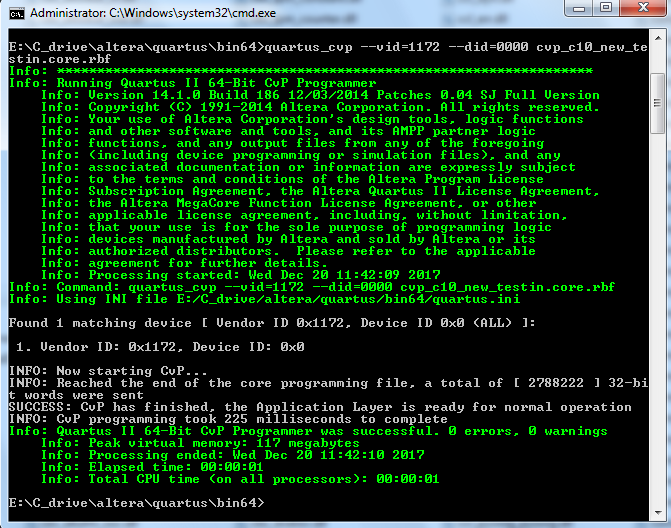
- Type the following command to program the core image:
quartus_cvp --vid=<Vendor ID> --did=<Device ID> xxx.core.rbf
where the value of Vendor ID and Device ID are in hexadecimal and specified in the Hard IP for PCI Express dialog box. For example, quartus_cvp --vid=1172 --did=0000 xxx.core.rbf.
- You can print out the kernel message using the dmesg to ensure the CvP is completed successfully.
Figure 11. Command Prompt Console