Visible to Intel only — GUID: zgs1512367317591
Ixiasoft
1.1. Acronyms and Definitions
1.2. Recommended System Requirements
1.3. Installation Folders
1.4. Boot Flow Overview
1.5. Getting Started
1.6. Enabling the UEFI DXE Phase and the UEFI Shell
1.7. Using the Network Feature Under the UEFI Shell
1.8. Creating your First UEFI Application
1.9. Using Arm* DS-5* Intel® SoC FPGA Edition (For Windows* Only)
1.10. Pit Stop Utility Guide
1.11. Porting HWLIBs to UEFI Guidelines
1.12. Tera Term Installation
1.13. Minicom Installation
1.14. Win32DiskImager Tool Installation
1.15. TFTPd64 By Ph.Jounin Installation
1.16. Revision History of Intel® Arria® 10 SoC UEFI Boot Loader User Guide
1.5.1. Compiling the Hardware Design
1.5.2. Generating the Boot Loader and Device Tree for UEFI Boot Loader
1.5.3. Building the UEFI Boot Loader
1.5.4. Creating an SD Card Image
1.5.5. Creating a QSPI Image
1.5.6. Booting the Board with SD/MMC
1.5.7. Booting the Board with QSPI
1.5.8. Early I/O Release
1.5.9. Booting Linux* Using the UEFI Boot Loader
1.5.10. Debugging an Example Project
1.5.11. UEFI Boot Loader Customization
1.5.12. Enabling Checksum for the FPGA Image
1.5.13. NAND Bad Block Management
Visible to Intel only — GUID: zgs1512367317591
Ixiasoft
1.6. Enabling the UEFI DXE Phase and the UEFI Shell
Task time: 60 minutes
- For a Windows* build, ensure that the SoC FPGA EDS and Arm* DS-5* Intel® SoC FPGA Edition debugger tools are installed on your machine.
- Complete the steps in Obtaining the UEFI Source Code.
- To boot in the DXE phase, edit the ~:\uefisocfpga\AlteraPlatformPkg\Arria10SoCPkg\Arria10SoCPkg.dsc file to change the PcdBoot_LOAD_UEFI_DXE_PHASE token value from 0 to 1 before you run the make command. To edit the file type:
$ notepad AlteraPlatformPkg\Arria10SoCPkg\Arria10SoCPkg.dscFigure 120. Modifying the PcdBoot_LOAD_UEFI_DXE_PHASE Parameter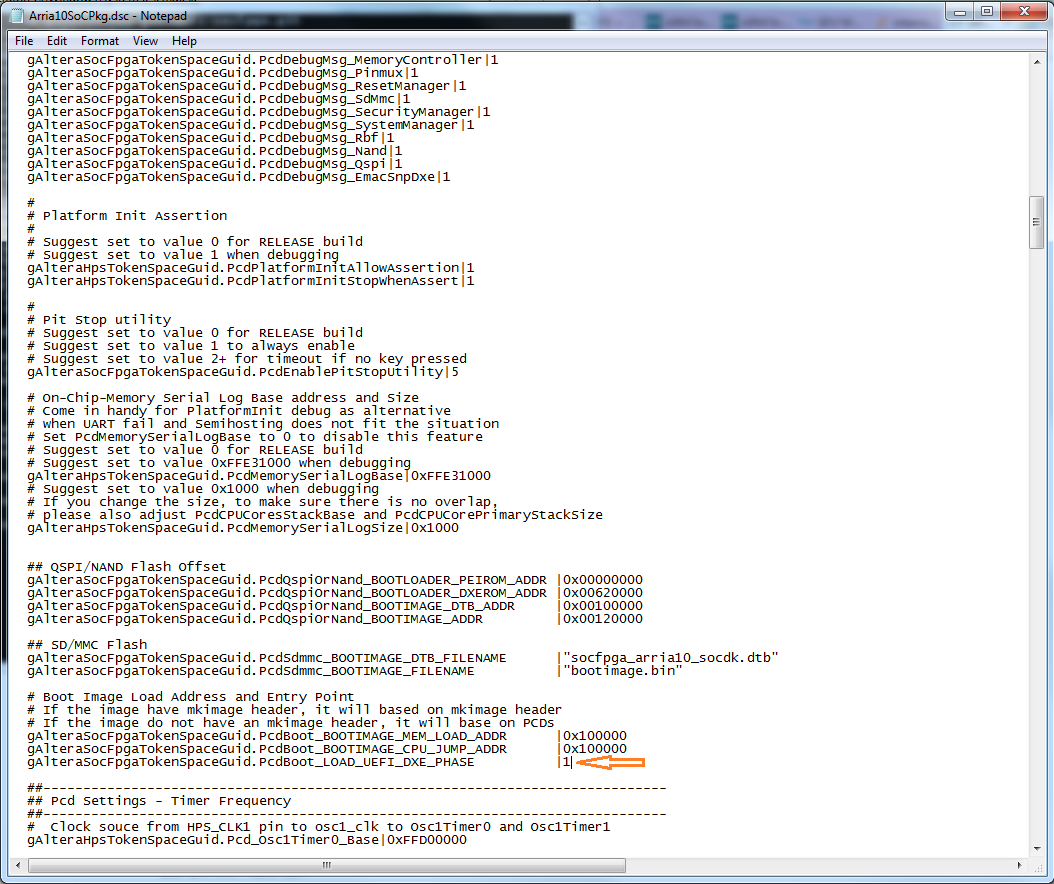
- Verify that the SOCEDS_DEST_ROOT and DS5_ROOT is set under the Windows* environment.
- Set SOCEDS_DEST_ROOT=c:\altera\15.1\embedded
- Set DS5_ROOT=”C:\Progra~1\DS-5”
Note: If you install Arm* DS-5* Intel® SoC FPGA Edition in the Program Files, the path C:\Progra~1\DS-5 is to prevent a build error from occurring due to a space between the word “Program Files” in the path. For other locations, please set the path correctly. - Open a new Windows* command prompt and execute the following commands:
~:\uefi-socfpga > setup ~:\uefi-socfpga> make - After the build is successful, you can copy the generated DXE.ROM file into the SD Card FAT32 partition.